
Secure Steel Coiled Rod Loads
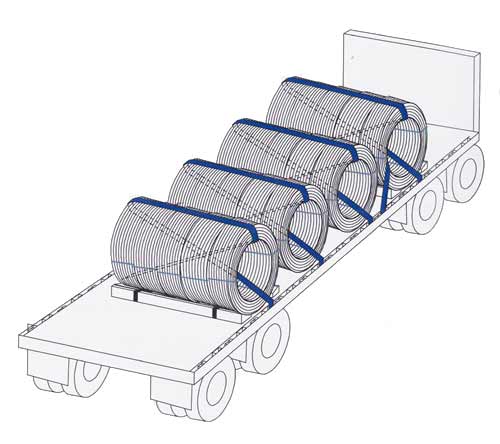
Coiled Rod Securing Procedure (method 1)
There are 2 approved ways to carry coiled rod. The preferred method is described first. If the shipper cannot place the coiled rod in an eye-to-side position, use the alternative way shown in method 2.
CAUTION: Do NOT secure coiled rod against the permanent bulkhead of the trailer.
- Set up 2 small coil racks with 4″x 4″ lumber: one for the first coil and one for the last coil.
- Load the first coil in the front rack.
- Secure the first coil with a strap as follows. Secure the strap from the winch side. Run the strap through the eye of the coil, over the top of the rod to the opposite side, and then through the eye of the rod again to the frame rail of the trailer. The strap will make an ” X ” in the center of the coil.
- Lay the remaining coils (except the last coil) against the front coil.
- Load the last coil in the rear rack with 4×4 lumber.
- Secure all coils with straps in the same manner described in step 3.
- Place horseshoe strap through the eye of the front coil to prevent forward movement of the coils.
- Tarp the load securely as required.
- Secure all loose equipment, including chains and binders, lumber, tarps, rubber belting, coil racks, edge protectors, and load bar.
Coiled Rod Securing Procedure (method 2)
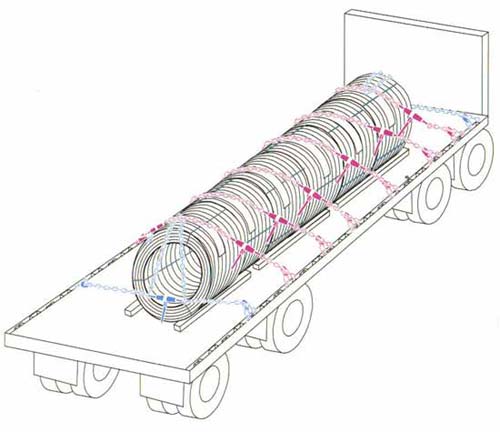
The alternate method of securing coiled rod is to construct a “spider web” over the front and rear coils in a row as follows:
CAUTION: Do NOT secure coiled rod against the permanent bulkhead of the trailer.
NOTE: Use three coil racks for each set of 8-foot beveled lumber.
- Set up small coil racks and 4″x 4″ beveled lumber (one set for each coil).
- Lay the first coil on the racks.
- Pass the first chain in front of the coil and secure on both sides. Use a binder to make a loop out of the slack in the chain, and drape the loop over the top of the coil.
- Secure a chain to the rear of the coil, pass it up through the top of the loop made from the other chain, and secure to the other side of the trailer. Tighten using binders on both sides as shown in the second illustration above.
- Lay the remaining coils on the racks against the front coil.
- Secure the chains diagonally across each coil, using rubber belting under the chains.
- Secure the final coil using a “spider web” of two chains in the same manner as with the first, facing the opposite direction.
- Tarp the load securely as required.
- Secure all loose equipment, including chains and binders, lumber, tarps, rubber belting, coil racks, edge protectors, and load bar.
